Finding Contrast: Seven Methods for Better Black and White Street Images
You'll learn how to shift your perspective from seeing colors to seeing values—the highlights and shadows that form the skeleton of a great image. Street photography often gets cluttered by neon signs or bright red clothing that distracts from the actual subject. By going monochrome, you strip away those distractions. You’ll find that shadows become subjects in their own right, and textures you never noticed before start to pop. It’s about simplifying the frame to focus on the story rather than the spectacle of color.
Why should you shoot street photography in black and white?
Color can be a huge distraction (honestly, it’s often a crutch). When you remove the color, you’re left with the core elements of composition: line, shape, and tone. This forces you to become a better photographer because you can’t rely on a pretty sunset or a vibrant flower to carry the weight of a boring shot. Black and white street photography also has a timeless quality that color just can’t touch. A photo taken in Richmond yesterday can look like it was taken in 1950 if you handle the tones correctly. It connects your work to the history of the medium, following in the footsteps of greats like those found at Magnum Photos.
Removing color also helps you focus on human emotion. When we look at a color portrait, our brains spend a lot of time processing skin tones and clothing choices. In monochrome, we look straight at the eyes and the expression. The emotional weight of a scene becomes much clearer. You’ll notice that a person’s face tells a much deeper story when it’s rendered in shades of grey. It’s not just about aesthetics; it’s about how the viewer feels when they look at your work. You want them to feel the grit of the city and the tension of the moment.
How do you find high contrast light in urban environments?
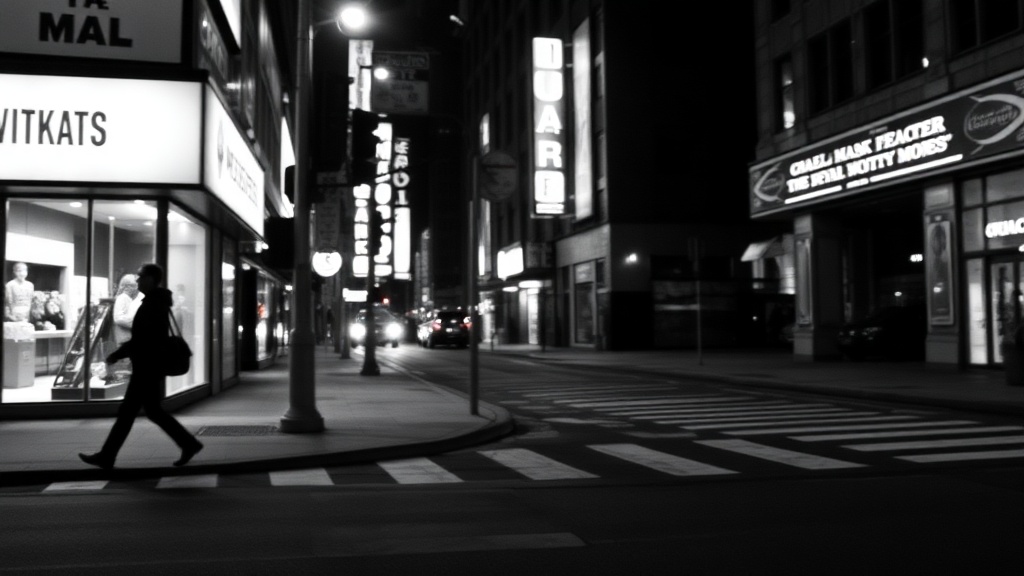
You need to look for harsh, direct light that creates deep shadows. While many photographers hide when the sun is at its peak, that’s actually the best time for high-contrast street work. Think about those long shadows in the afternoon or the bright patches of light between tall buildings downtown. This "Chiaroscuro" effect—the dramatic contrast between light and dark—is what makes a monochrome image sing. Look for a "spotlight" of sun hitting a sidewalk and wait for someone to walk through it. This creates a natural frame that isolates your subject from the messy background.
Don’t be afraid of completely black shadows. In color, we often try to preserve detail in every corner of the frame. In black and white, you can let those shadows go to total black. It adds mystery. It creates a sense of drama that you just don’t get with a perfectly exposed, flat image. If you’re shooting in Richmond, the back alleys of the Fan District are perfect for this. The way the light hits the brickwork and creates jagged shadows is a dream for any monochrome enthusiast. You just have to be patient and watch how the sun moves across the environment.
What are the best camera settings for monochrome images?
Always shoot in RAW, but set your camera’s display profile to a black and white film simulation. This is a big deal. If you see the world in color on your screen, you’ll keep looking for color-based subjects. If your viewfinder is showing you high-contrast black and white, you’ll start seeing the shapes and shadows more clearly. Since you’re shooting RAW, you’ll still have all the color data later if you need it for post-processing, but the monochrome preview helps you "pre-visualize" the final result. It’s a simple trick that changed how I shoot entirely.
Keep your ISO as low as possible for clean shots, but don’t fear the noise if the sun goes down. Digital noise often looks like film grain in black and white, which can actually add to the mood. Also, consider using a faster shutter speed than you think you need. Street photography is about movement, and you want those edges to be sharp to define the shapes. A blurry shape in color might look like an accident; a sharp silhouette in black and white looks like a choice. If you want to dive deeper into technical specs for different sensors, DPReview is always a solid place to check how different cameras handle high-ISO monochrome files.
1. Focus on Geometric Shapes
Cities are built on grids, circles, and triangles. When you take color away, these shapes become much more prominent. Look for the curve of a staircase, the repeating rectangles of windows, or the converging lines of a narrow street. These elements provide a strong structure for your photo. I like to find a strong geometric background and then wait for a human element to break that pattern. It creates a visual tension that keeps the viewer engaged. You aren't just taking a picture of a person; you're placing a soul inside a machine of architecture.
2. Seek Out Textures and Patterns
Texture is the secret sauce of monochrome. Peeling paint, rusted metal, the weave of a wool coat—these things look incredible when you emphasize the micro-contrast. In color, these textures might get lost because the colors are too similar. In black and white, the tiny shadows created by the texture give the image a tactile feel. You want the viewer to feel like they could reach out and touch the rough surface of the brick wall or the smooth skin of a subject. It's about bringing a 3D feel to a 2D medium.
3. Use Negative Space to Create Focus
Negative space doesn't have to be empty; it just needs to be quiet. A large area of deep shadow or a bright, blown-out sky can act as negative space. This forces the viewer's eye exactly where you want it to go. I often underexpose my shots by a stop or two to crush the shadows into a dark void. This makes the lit subjects pop out with incredible intensity. It’s a bold move, but street photography isn’t the place for playing it safe. You want to make a statement with your frames.
4. Look for Tonal Gradations
While high contrast is great, don't ignore the middle greys. A photo that is just black and white can feel a bit harsh (sometimes that's the goal, though). A photo with a full range of tones—from the deepest blacks through every shade of grey to the brightest whites—feels rich and sophisticated. Look for soft light reflecting off a glass building or the way fog diffuses the sun. These scenes offer a different kind of beauty that relies on subtle transitions rather than hard edges. It's like the difference between a shout and a whisper; both are effective if used at the right time.
5. The Power of Silhouettes
Silhouettes are a staple of the genre for a reason. They turn people into icons. When you can't see someone's face, they become a stand-in for anyone. It adds a layer of anonymity and mystery. To get a great silhouette, you need to find a bright background and a subject that is significantly darker. Expose for the background, and let your subject fall into darkness. The key here is the outline. Make sure the subject has a clear, recognizable shape. If they are just a big dark blob, it won't work. You want to see the stride of their walk or the outline of their hat.
6. Experiment with Color Filters
Even though you're shooting in black and white, color filters (digital or physical) change how different colors are converted to grey. A red filter will make a blue sky turn almost black, creating a massive amount of drama. A green filter can make skin tones look more rugged and detailed. Most modern mirrorless cameras let you apply these "digital filters" in the settings. I use the orange filter setting most of the time because it darkens the sky slightly and smooths out skin tones just enough. It gives the image a bit more "punch" without looking over-processed. It's a small adjustment that yields big results.
7. Study the Interaction of Light and Shadow
Shadows aren't just the absence of light; they are a compositional tool. Sometimes the shadow of a person is more interesting than the person themselves. I've spent hours watching shadows move across a wall, waiting for someone to walk by so their shadow interacts with a stationary one. It's a bit like a dance. You have to be aware of where the sun is at all times. If you're walking around Richmond, pay attention to how the light changes as you move from the wide-open spaces of Brown's Island to the narrow streets of Shockoe Bottom. The city is constantly painting new scenes with light; you just have to be there to catch them.
You won't get it right every time. Street photography is a game of failures. You might take two hundred shots and only find one that actually works. That’s fine. The process of looking for these elements will make you more observant. You'll start noticing the way light catches the steam from a manhole cover or the way a stranger's eyes reflect the streetlights. These little details are what make the city alive. By stripping away the color, you’re getting closer to the truth of the street. It’s honest, it’s raw, and it’s exactly why I keep coming back to it every single day with my camera in hand.