Mastering Golden Hour: Essential Techniques for Stunning Natural Light Portraits
Golden hour transforms ordinary portraits into extraordinary images. This post covers the precise timing, camera settings, and positioning techniques that separate amateur snapshots from professional-quality work. You'll learn how to read natural light, adapt to changing conditions, and position subjects for that warm, flattering glow that makes viewers stop scrolling. Whether shooting with a DSLR or a smartphone, these techniques apply universally.
What Time Is Golden Hour for Photography?
Golden hour occurs during the first hour after sunrise and the last hour before sunset. The catch? That "hour" shifts dramatically depending on season and location. In mid-winter, the golden window might stretch to 90 minutes. In summer, you're looking at maybe 45 minutes of prime light.
Apps like PhotoPills and Sun Surveyor take the guesswork out of planning. They show exactly where the sun will hit at any given moment — worth every penny when you're coordinating with busy subjects. (Nothing kills momentum like arriving 20 minutes late to golden hour.)
Here's the thing about Richmond specifically: the James River creates unique lighting conditions. Water reflections extend that warm quality deeper into blue hour than you'd get on dry land. Local photographers have known this for decades.
Reading the Quality of Light
Not all golden hour light behaves the same. Early golden hour — that first 15 minutes — produces cooler, pinker tones. Late golden hour leans heavy orange and red. Cloud cover acts as a giant softbox, diffusing harsh edges. Clear skies? You'll get stronger directional light with more contrast.
Most portrait work benefits from the middle segment — roughly 20-45 minutes into the window. That's when skin tones look their absolute best. The light wraps around facial features without creating raccoon shadows under the eyes.
What Camera Settings Work Best for Golden Hour Portraits?
Start with aperture priority mode at f/2.8 to f/4 for creamy backgrounds. Shutter speed should stay above 1/125s to avoid motion blur (faster if your subject moves around). ISO stays as low as possible — usually 100-400 during proper golden hour.
That said, settings aren't universal prescriptions. Backlit portraits — where the sun sits behind your subject — require entirely different thinking. The camera's meter gets confused by bright backgrounds. You'll need exposure compensation, typically +1 to +2 stops, or switch to manual mode entirely.
White balance deserves attention too. Auto white balance often fights against golden hour's warmth, neutralizing the very quality you're chasing. Try "Cloudy" or "Shade" presets, or set a custom Kelvin temperature around 5500K-6000K. Shoot RAW regardless — you can always adjust later.
| Lighting Scenario | Aperture | Shutter Speed | ISO | White Balance |
|---|---|---|---|---|
| Front-lit golden hour | f/2.8 - f/4 | 1/250s - 1/500s | 100-200 | Cloudy/Shade |
| Backlit silhouette | f/5.6 - f/8 | 1/500s - 1/1000s | 100-400 | Daylight |
| Backlit with fill | f/2.8 - f/4 | 1/125s - 1/250s | 200-800 | Cloudy |
| Rim light only | f/4 - f/5.6 | 1/250s - 1/500s | 200-400 | Auto (correct in post) |
Lenses That Excel in Golden Hour
Prime lenses dominate golden hour work. The Canon RF 85mm f/1.2L and Sony 85mm f/1.4 GM render that background compression beautifully when the light hits just right. For wider environmental portraits, the Nikon Z 35mm f/1.8 S captures context without distortion.
Budget alternatives exist. The TTArtisan 50mm f/1.2 (around $100) delivers surprisingly pleasing bokeh. Vintage lenses — the Helios 44-2 58mm f/2 — create that dreamy, swirly background effect that Instagram loves. Just be ready for manual focus.
How Do You Position Subjects for Golden Hour Portraits?
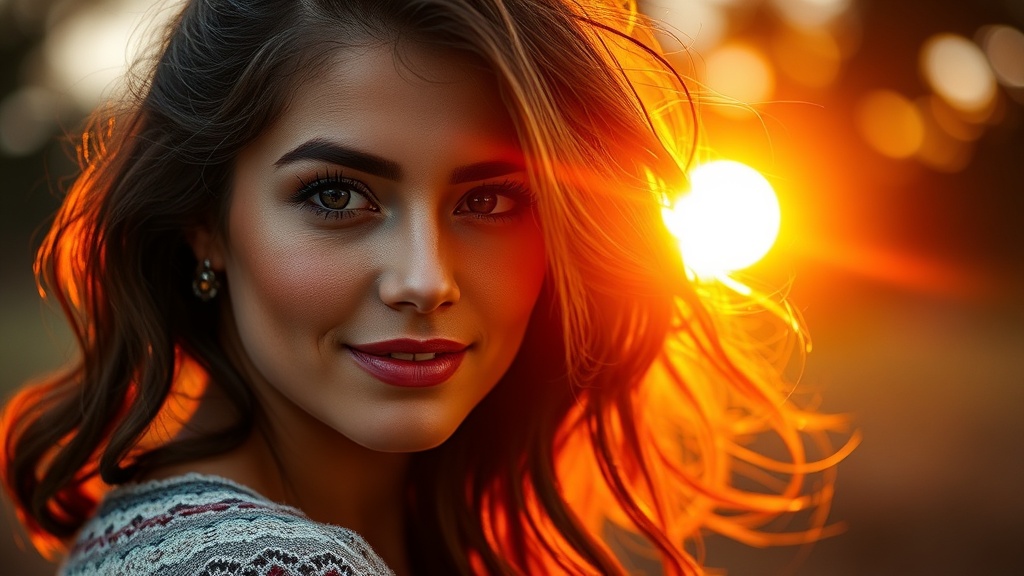
Subject positioning determines whether golden hour flatters or flatlines your portrait. The classic approach: place the sun at a 45-degree angle behind and to one side of your subject. This creates dimensional lighting with gentle shadows defining facial structure.
Face your subject toward the open sky — away from the sun. The sky becomes a massive soft light source, filling shadows naturally. (Clouds help here. A clear sky behind the subject can create harsh contrast.)
Worth noting: open shade near golden hour behaves differently than midday shade. The warm ambient light bounces everywhere, eliminating that cold, dead quality you get at noon. Position subjects just inside tree lines or building shadows for this effect.
"Golden hour is forgiving, but it's not magic. You still need to pay attention to where the light falls on the face. The difference between a good portrait and a great one often comes down to asking your subject to turn their chin two inches." — Annie Leibovitz, in her MasterClass on portrait photography
The Three Classic Golden Hour Setups
Backlighting creates that ethereal halo effect around hair and shoulders. Expose for the subject's face, letting the background blow out slightly. Use a reflector or gentle fill flash — the Godox V1 with a dome diffuser works well — to avoid muddy shadows on the face.
Side lighting emphasizes texture and form. Position the sun 90 degrees to your subject. This sculpts cheekbones and creates drama. The shadows fall across the frame, adding depth that flat front-lighting can't match.
Rim lighting separates subjects from busy backgrounds. The sun sits directly behind, creating a bright outline. You'll need significant fill light to avoid silhouettes unless that's your goal. This technique shines during engagement sessions where couples want that romantic, glowing look.
Common Golden Hour Mistakes (and Fixes)
Missing the window tops the list. Photographers — especially newcomers — underestimate how fast the light changes. That perfect warm glow? Gone in minutes. Arrive early. Scout locations beforehand. Have backup indoor options if clouds roll in.
Overexposure kills more golden hour portraits than bad posing. The histogram lies — it sees all that bright sky and suggests underexposure. Trust your eyes. Skin tones should look warm, not orange. If the histogram clips on the right, that's often okay; blown highlights in sunset skies rarely look bad.
The catch? Underexposure creates muddy, noise-filled shadows that are hard to recover. Err slightly toward overexposure when shooting RAW. You can always pull back highlights. Shadow recovery introduces artifacts fast.
Dealing with Mixed Lighting
Urban golden hour portraits face an enemy: artificial light. Street lamps, building interiors, and neon signs compete with natural warmth. The color temperatures clash — warm orange sunlight versus cool blue LED.
Solutions exist. Gel your flash to match ambient conditions. Convert the entire image to black and white (golden hour textures work beautifully in monochrome). Or lean into the contrast, creating intentionally stylized portraits where color temperature tells a story.
Post-Processing for Golden Hour Images
Lightroom and Capture One handle golden hour RAW files beautifully. The key restraint: don't push orange saturation too far. Skin turns radioactive fast. Lift shadows gently. Add subtle warmth to highlights while keeping midtones neutral.
Color grading in the Adobe Lightroom calibration panel offers precise control. Adjust the red primary hue toward orange for that classic film look. Drop green primary saturation slightly — it reduces distracting foliage color that competes with skin tones.
Local adjustments matter more than global ones. Use radial filters to brighten faces subtly. Brush clarity onto eyes (sparingly). Darken distracting bright areas in the frame that pull attention from your subject.
Mobile Workflow Options
Not everyone edits on desktop. VSCO offers film emulation presets designed specifically for golden hour — the Kodak Portra simulations work well. Lightroom Mobile syncs with desktop collections, letting you deliver preview galleries to clients before you even get home.
For quick social media turnaround, Darkroom (iOS) provides excellent selective color tools. Adjust orange and yellow luminance independently — crucial when skin tones and sunset share similar hues.
Golden hour rewards preparation and punishes hesitation. The light changes constantly, demanding quick decisions and confident execution. Master these techniques, and that fleeting window becomes less intimidating. Your portraits will carry a warmth and dimension that midday shooting simply cannot replicate. The best photographers don't fight golden hour's brevity — they embrace it, creating images that feel alive.