Mastering Golden Hour: The Complete Guide to Natural Light Portraits
Golden hour portraits have become the gold standard for photographers seeking that warm, ethereal glow that flatters every subject. This guide covers exactly when to shoot, how to position subjects for the best light, which camera settings maximize results, and the gear that makes a genuine difference. Whether shooting engagement photos, family portraits, or personal branding content, understanding golden hour fundamentals transforms good images into extraordinary ones.
What Time Is Actually Golden Hour for Portrait Photography?
Golden hour refers to the roughly 60-minute window after sunrise and the 60-minute window before sunset when the sun sits low on the horizon. The exact timing shifts dramatically based on season and geographic location — in Toronto, golden hour might start at 4:30 PM in December but stretch until 8:45 PM in June.
Here's the thing: "hour" is rarely accurate. The quality of light depends heavily on atmospheric conditions. Clear days produce crisp, directional golden light. Overcast or hazy conditions diffuse that warmth across a longer period — sometimes two hours — but with less dramatic contrast.
Apps like PhotoPills and Sun Seeker take the guesswork out of planning. They calculate precise sun angles for any location on any date. For location portraits in urban environments like Vancouver's Gastown or Montreal's Old Port, these tools help predict when buildings will cast unwanted shadows across the scene.
Arriving 30 minutes before official golden hour begins allows time to scout locations and test compositions. The light changes fast — sometimes dramatically within 10 minutes — so being ready matters more than having the perfect gear.
Where Should You Position Your Subject Relative to the Sun?
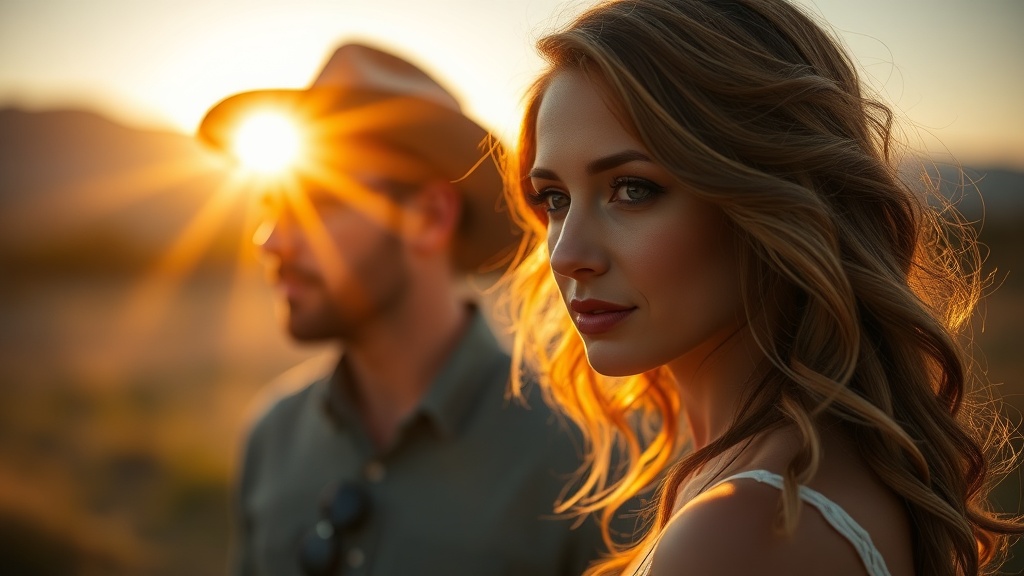
The classic approach positions the subject with the sun behind them — backlighting — which creates that dreamy rim light around hair and shoulders while casting a warm glow across the frame. This technique (sometimes called "contre-jour" in photography circles) produces those creamy, glowing portraits that dominate Instagram feeds.
That said, backlighting isn't the only option. Side lighting — where the sun hits the subject from a 45 to 90-degree angle — sculpts facial features with dimension and depth. This works beautifully for editorial portraits where character and texture matter more than soft perfection.
Direct front lighting, with the sun behind the photographer hitting the subject squarely, is generally the least flattering during golden hour. Even diffused evening light can create harsh shadows under eyebrows and noses. The exception? Overcast golden hour conditions, where clouds act as a massive natural softbox.
Reflectors solve many positioning challenges. A simple 5-in-1 collapsible reflector — the Westcott Illuminator series runs about $45 — bounces fill light back onto shadowed faces when shooting backlit. Position it opposite the sun, just out of frame. Gold surfaces amplify warmth; white surfaces provide neutral fill; silver adds crisp contrast for dramatic effects.
Which Camera Settings Work Best for Golden Hour Portraits?
Golden hour presents a specific challenge: rapidly fading light combined with a desire for shallow depth of field. The solution starts with aperture priority mode (or manual mode for experienced shooters) set between f/1.8 and f/2.8 for that creamy background separation.
Shutter speed becomes the critical variable. Backlit portraits often require faster speeds — 1/250s or quicker — to prevent overexposing the background sky while keeping the subject properly exposed. Front-lit scenarios can drop to 1/125s or slower. Image stabilization (either in-body like Sony's IBIS systems or lens-based) helps when handholding at slower speeds.
ISO should stay as low as possible — ideally base ISO (100 or 200 depending on camera) — to preserve dynamic range and minimize noise. When light drops below usable levels, raising ISO to 800 or even 1600 on modern cameras like the Canon EOS R6 Mark II or Nikon Z6 III produces remarkably clean results.
| Scenario | Recommended Settings | Why It Works |
|---|---|---|
| Backlit silhouette effect | f/2.8, 1/500s, ISO 100, expose for sky | Darkens subject while preserving colorful sky details |
| Balanced backlit portrait | f/2.0, 1/250s, ISO 200, +0.7 exposure comp | Brightens subject without blowing out background highlights |
| Side-lit dramatic portrait | f/1.8, 1/320s, ISO 100 | Sharp focus on eyes with natural shadow sculpting |
| Group portraits (3-5 people) | f/4.0, 1/200s, ISO 400 | Increased depth of field keeps everyone sharp |
| Golden hour ending (low light) | f/1.4, 1/100s, ISO 800, use stabilization | Maximizes available light while maintaining reasonable sharpness |
Manual exposure often outperforms automatic modes during golden hour. The camera's metering system gets confused by bright skies and dark subjects in the same frame. Spot metering on the subject's face — or simply using the histogram to ensure highlights aren't clipped — produces more consistent results.
What Gear Actually Matters for Natural Light Portraits?
The camera body matters less than the lens during golden hour. A $300 used Canon EOS 80D paired with an 85mm f/1.4 Sigma Art lens produces more compelling portraits than a $4,000 Sony A7R V with a kit zoom. Fast primes — 85mm, 50mm, and 35mm focal lengths — render golden hour backgrounds as creamy, glowing washes of color.
Worth noting: focal length affects both perspective and background compression. An 85mm lens (the classic portrait length) compresses backgrounds beautifully, making distant trees and cityscapes appear closer and more prominent. A 35mm lens includes more environmental context — ideal for storytelling portraits at locations like Toronto's Riverdale Farm or Vancouver's Stanley Park seawall.
Lens hoods matter more than most beginners realize. Even during golden hour, stray light hitting the front element reduces contrast and creates flare. Sometimes flare is desirable — it adds character and warmth — but controlling it intentionally beats accidental haze.
The catch? Expensive gear doesn't guarantee golden hour success. Understanding light direction, having subjects comfortable and relaxed, and timing the shoot correctly trump any equipment advantage. Some of the most iconic portrait work — think Annie Leibovitz's early Rolling Stone covers — was shot with minimal gear during available light windows.
How Do You Handle Changing Light Conditions?
Golden hour light transforms every few minutes. What worked perfectly at 7:15 PM might fail completely by 7:35 PM. Experienced photographers shoot sequences — capturing the same pose as the light evolves — rather than chasing perfection in a single frame.
Communication becomes essential. Direct subjects clearly: "Turn slightly toward the light," "Chin up just a bit," "Hold that — the light is perfect right now." The best golden hour portraits often come from the last 10 minutes before sunset, when the sky explodes with orange and pink tones that reflect onto skin as natural fill.
White balance deserves attention. Auto white balance often neutralizes the very warmth that makes golden hour special. Setting a custom Kelvin temperature — around 5500K to 6000K — preserves that golden cast. Alternatively, shoot RAW and adjust white balance during post-processing without quality loss.
Golden hour portraits reward patience and preparation. Scout locations beforehand. Check weather forecasts (partial cloud cover often produces the most dramatic skies). Bring a lens cloth — low sun angles mean flare-prone shooting straight into light sources. Most importantly, stay present. The light changes fast, and the difference between a good frame and a great one might be 30 seconds of perfect conditions.
"The best camera is the one you have with you — but the best light is the light you showed up early for."